Make a simple, personal, URL shortener with Now.sh
Remember services like Bitly and TinyURL? Yeah, they still exist, shortening your URLs for you, they’ve been around for a long time too.
Bitly founded in 2008 and TinyURL founded in 2002 😱
In this post I’m detailing how I made my own Bitly with Now.sh.
You can make your own one too as I’m about to detail the process here, or you can TL;DR for the video.
What you need:
- Node (to run the now CLI)
- The now CLI
- Vercel.com account
- GitHub account (not essential)
- Yor own domain (not essential)
Examples, why would I use a short URL?
I use short URLs for sharing my content, if you take a look at this blog post URL is quite long and not something you can reel off quickly to someone.
There’s a talk I did about Gatsby, titled “Build-time and Client Run-time Data Fetching in Gatsby” the URL for it is:
With a short URL I can condense it down a bit:
Not massively shorter, and granted the original URL has no place being that long!
Other examples could be the “Build a coding blog from scratch with Gatsby and MDX” guide I did at the end of last year:
- Full URL https://scottspence.com/posts/build-an-mdx-blog
- Short URL https://ss10.dev/bab-guide
Or if you have a crazy URL no one is going to be able to recite from memory, like my YouTube channel URL:
- Full URL https://www.youtube.com/channel/UCnngLXpLSFsKkDhFoO9Ct3w
- Short URL https://ss10.dev/youtube
- Shorter still https://ss10.dev/yt
I do have a vanity URL for my YouTube channel which is https://www.youtube.com/c/ScottSpencePlease, but it’s case sensitive. 🤦♂
Do I have to use Vercel? 🤔
No, you can use Netlify as well. There’s a great Kent C Dodds example with Netlify that I used before moving to Vercel.
You don’t have to use Netlify either, you do you. 😸
There’s many ways to do it and the best way for you may be different to me. You will need a domain name and a hosting service, that’s what I’m doing with Vercel here.
Redirects
The way I’m doing this is with redirects, so it will be like in the examples earlier, give a path to your URL then use a redirect rule.
{
  "source": "/yt",
  "destination": "https://www.youtube.com/channel/UCnngLXpLSFsKkDhFoO9Ct3w"
}
Get set up 🛠
If you don’t have a machine set up for web development I have written about getting set up for Windows.
There’s also a video I’ve made to go from scratch to Create React App on Ubuntu 19.04.
If you’re following along and you haven’t done so already, you’ll need to install the Vercel CLI:
# if you're using npm, then
# npm i -g now
yarn global add now
Then you’ll need to authenticate with the CLI:
now loginYou will be prompted with a phrase, something like Handsome Turtle that should match the phrase in the email Vercel sends you. You can
authenticate by clicking the link in the email.
Create the project
I’m going to create a directory for the project to live in, then
change into that directory and make the project with yarn init -y.
mkdir short-urls # create directory
cd short-urls # change to newly created dir
yarn init -y # initialise the project
That’s going to create my package.json file with the project details
in it.
Next to create the now.json file this is going to be where all the
redirects live:
touch now.jsonIn the now.json file I’m going to add the Vercel Now platform
version then the redirects array with the first redirect being where I
want my domain to default to.
{
  "version": 2,
  "redirects": [
    {
      "source": "/",
      "destination": "https://scottspence.me"
    }
  ]
}
Deploy the project
That is all the configuration I need for now, now I’m going to deploy the project using the CLI this will push the project to the Vercel hosting service.
To deploy the current directory I’ll do the following command:
nowAs this is the first time I’ve deployed this project there will be a lot of prompts from the CLI, I’ll answer the default answer to all of these questions:
- Set up and deploy project?: y
- Which scope (this is my user account): Scott Spence
- Link to an existing project?: n
- Whats your project name (hit return): short-urls
- In which directory is your code located (hit return)?: /
- Want to override the settings?: n
The CLI will output two URLs, the first to my project on Vercel Now and the second for the actual project. I’ll click on the first one and and inspect the project.
As I set the root of the redirect to go to my portfolio site that’s what I have in my project overview in Vercel.
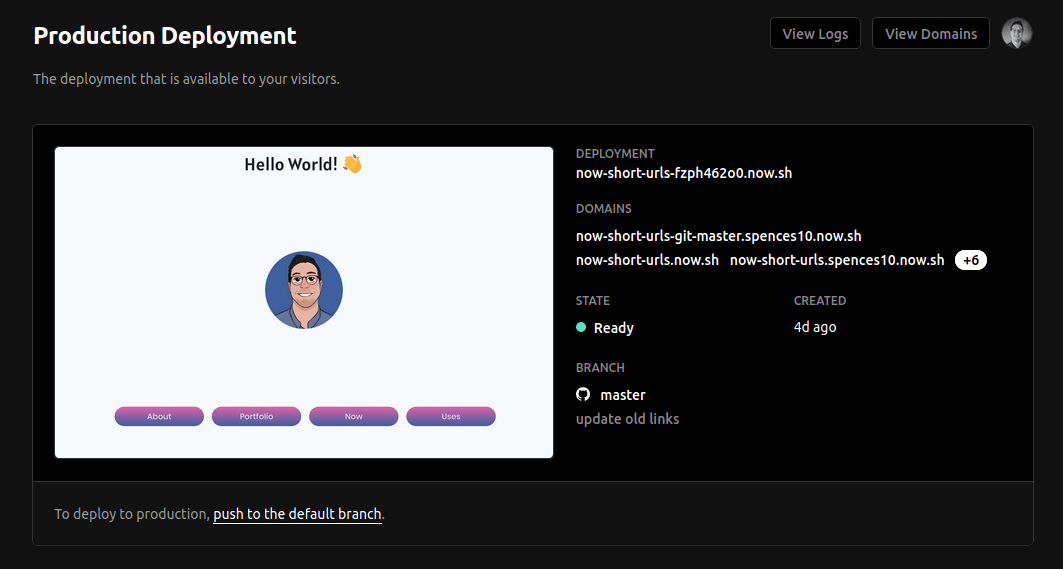
I can now take that URL (now-short-urls-fzph462o0.now.sh) add it to a browser and it will redirect to https://scottspence.me.
Now when I deploy this with the --prod flag in the Vercel CLI it
will use the project URL (now-short-urls.now.sh).
Ok so that was quite straightforward, right?
Now each time I want to add a short URL I’ll add it to the now.json file and run the Vercel CLI again to deploy the project.
But I can take out the deployment part and leave that to the Vercel GitHub integration.
So, better get that project on GitHub!
Add the Project to GitHub
Go to GitHub, click on the plus icon next to my profile picture, select ’New repository‘.
Enter the new project name and click the ‘Create repository’ button.
GitHub supplies the git commands to get the project onto GitHub.
Before that I’m going to initialise my project and add what I have to git:
git init
git add .
git commit -m 'init 🔥'
Then add the remote repository and push to it:
git remote add origin [email protected]:spences10/short-urls.git
git push -u origin master
That’s it the project is now on GitHub and I can start using the Vercel GitHub integration.
Use Vercel for GitHub
Vercel has a GitHub integration so that you can deploy automatically from a push to your master branch on your project or via a pull request.
The Vercel documentation for this is really good so I’m going to link that here.
The docs will walk you through setting up the GitHub integration with your GitHub account and linking a project.
There are also integrations available for GitLab and Bitbucket.
Now each time I add a short url to my project all I have to do is git commit and push to GitHub and the Vercel GitHub integration will take care of the rest.
Add my domain to Vercel
Now I’m going to add my own domain to Vercel from the ‘Settings’ panel of my project I can select ‘Domains’ and add in my own domain.
My domain isn’t supplied by Vercel so I will need to configure the DNS settings in my domain provider by adding the custom DNS configuration supplied here by Vercel.
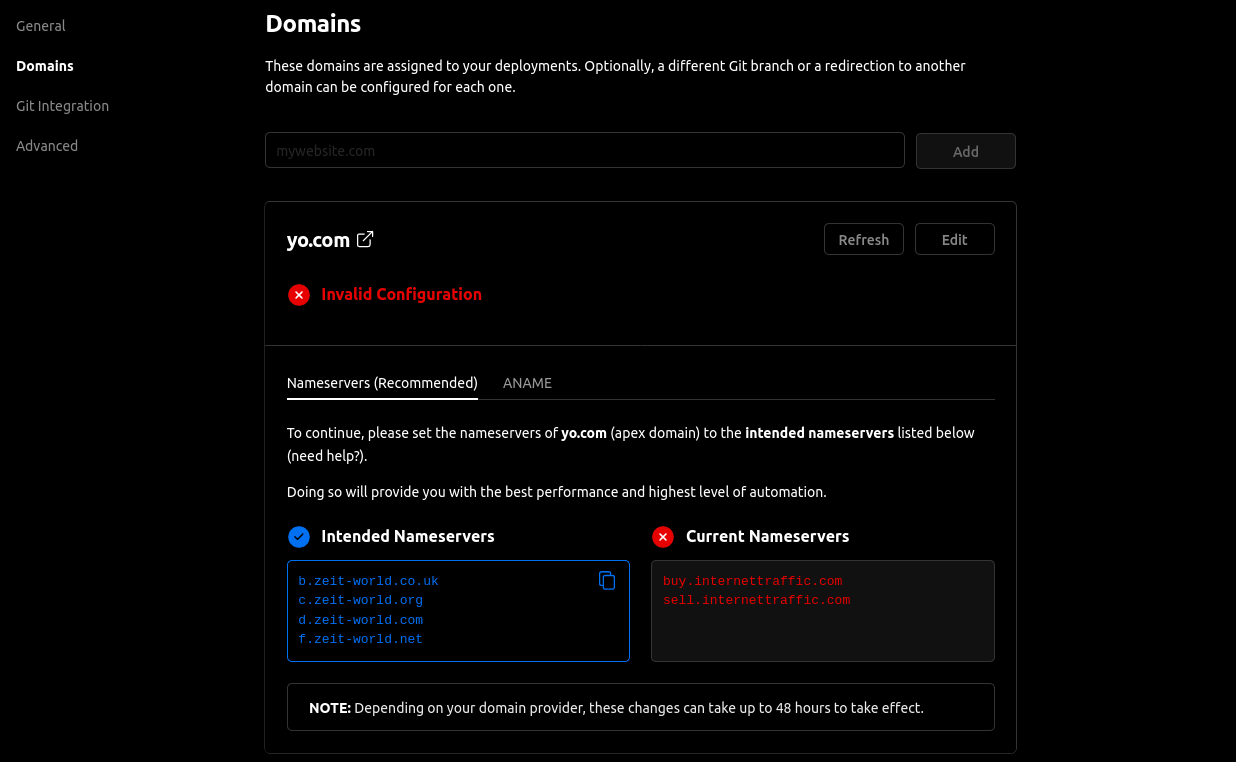
The cool thing with Vercel is that I can have many domains pointing to the same project.
Here’s a video detailing the process
Resources
There's a reactions leaderboard you can check out too.